Teams – now in Lock-down – Limit creations

So, in these times, Teams are becoming extremely popular and valuable for company’s with everybody working from home, and Microsoft giving away 6-months of free Teams licenses for new Tenants, it’s growing crazy fast. Its easy to get started, and users can create teams out-of-the-box🙈.

But for a few Administrators it can (In my own humble opinion, anyways) turn into a Wild West with out any form of control, with users creating new teams, as they like. (Why this isn’t a build in feature, and enabled by default, I don’t understand?🙄)

It might be an “old school” kind of thinking, but I would like some control over who does what in “my environment”.

I figured that others would be in the same situation, so I started my little adventure, in to figuring out how to “Lock-down” Teams, so that normal users wont be able to create what ever they want. You can do this in various ways, but the one I liked the most, is where you can control access to Teams creation through Group access. Fortunately for us, Microsoft has released an article on how to. You can read the original MS article HERE.

Lets get into it wlEmoticon-fingerscrossed.png

First of, you need to log in to your Office 365 Tenant, with your Global Admin and create the security groupgroup creation
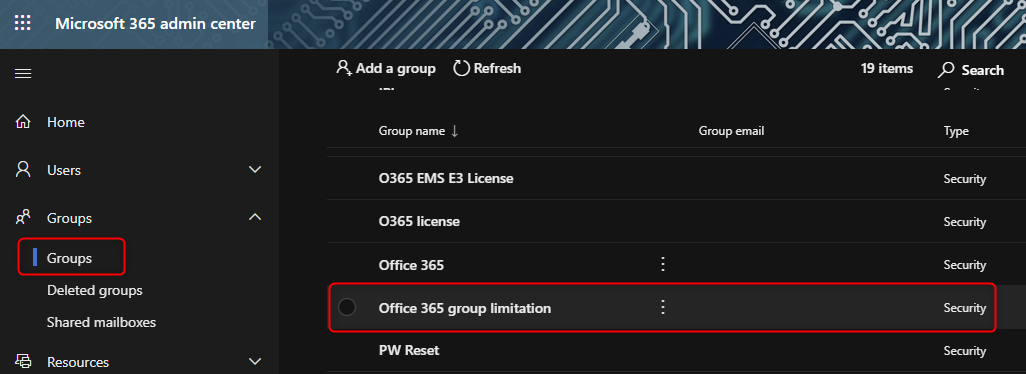
In my Example I created the group “Office 365 group limitation” Copy the below PowerShell script to your favorite editor, like Notepad, PowerShell ISE or Visual Studio Code. Name the script how you like, I kept it like MS suggested, GroupCreators.ps1

$GroupName = "Office 365 group limitation"
$AllowGroupCreation = "False"

Connect-AzureAD

$settingsObjectID = (Get-AzureADDirectorySetting | Where-object -Property Displayname -Value "Group.Unified" -EQ).id
if(!$settingsObjectID)
{
	  $template = Get-AzureADDirectorySettingTemplate | Where-object {$_.displayname -eq "group.unified"}
    $settingsCopy = $template.CreateDirectorySetting()
    New-AzureADDirectorySetting -DirectorySetting $settingsCopy
    $settingsObjectID = (Get-AzureADDirectorySetting | Where-object -Property Displayname -Value "Group.Unified" -EQ).id
}

$settingsCopy = Get-AzureADDirectorySetting -Id $settingsObjectID
$settingsCopy["EnableGroupCreation"] = $AllowGroupCreation

if($GroupName)
{
	$settingsCopy["GroupCreationAllowedGroupId"] = (Get-AzureADGroup -SearchString $GroupName).objectid
}
 else {
$settingsCopy["GroupCreationAllowedGroupId"] = $GroupName
}
Set-AzureADDirectorySetting -Id $settingsObjectID -DirectorySetting $settingsCopy

(Get-AzureADDirectorySetting -Id $settingsObjectID).Values

Change the Group name in the script, to the group name you created in the beginning. You will need your O365 Global admin, to run the script. Also if you haven’t already, you need to install the Azure AD module for PowerShell.

Install-Module AzureADPreview

If you have the used the module before or maybe have the general availability version (2.0), make sure you either remove and reinstall or update it before continuing.

And you’re ready 👍 If you have a handful of users that you trust, you add them to the group, or maybe your Helpdesk workers, so that they can create Teams for the users.

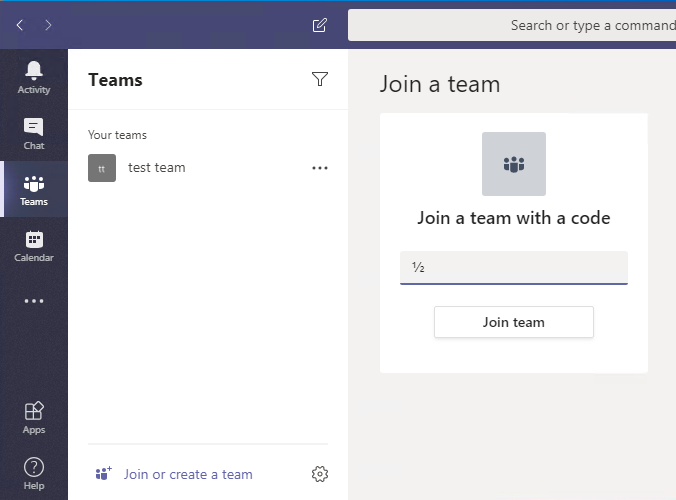
This is what it looks like now for the users!

Without group membership…

2020-04-14_09h31_57

With group membership…

2020-04-14_09h33_18

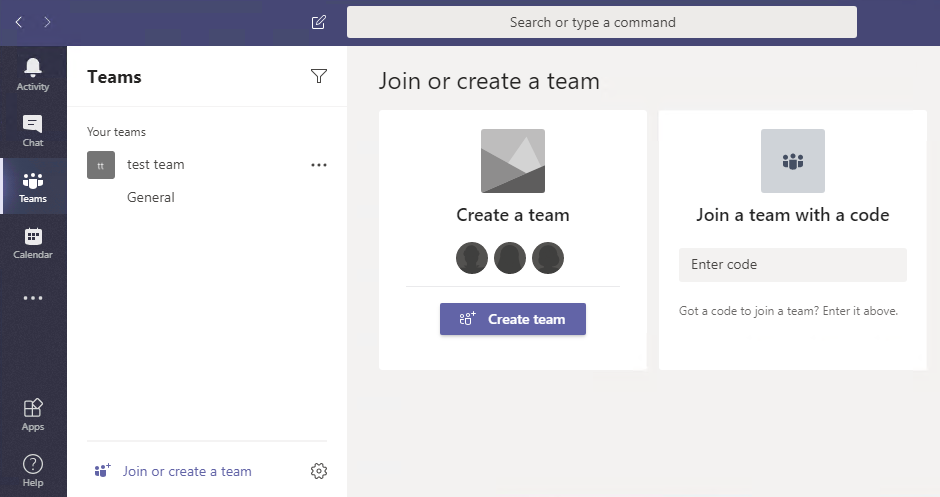
From now on, when users go to Teams and click the “Join or Create a team”, the only options is to join a team with a code or they can search for the Team, if they know the name. Here’s a few options:

  1. You as an admin, add them.
  2. You tell the newly appointed owner to add users themselves 👍
  3. The users search for the Team and join 👍
  4. Or you send them a Code, that they can use to join the Team with (Team owner can do this) 👍

That’s it, you’re done and have just a little more control with what’s going on again 😊

Oops, I deleted AZUREADSSOACC – What now – How to fix

Accidents happen, we are only human and sometimes we accidently delete something that we shouldnt have. In most cases its no big deal, we can restore wlEmoticon-thumbsup.png. When it comes to Active Directory, it actually can be an issue. AD restores can be a nightmare (in my humble oppinion, anyways).

On a quick sidenote, enable AD recycle Bin, it can really save you some time.

Open Active Directory Administrative Center

2019-10-08_10h48_48

2019-10-08_10h50_05

After enabling it, you can’t disable it (but why would you?)

BUT, in this case we “act” like, we havent enabled it wlEmoticon-smile.png

So somebody accidently deleted the AZUREADSSOACC computer account . This is the “virtual” computer account, used with Azure AADConnect when you enable SSO. (You can read more about it in a previous articel HERE.

Normally its placed In the Computers container2019-10-08_11h12_28

But, in this case we deleted it ( And just to prove to you, that I’m not cheating smiley disappointed)

2019-10-08_11h13_55

It’s gonewlEmoticon-sleepysmile.png


First you need to log on the computer on which you have AADConnect running.

Right click, and choose run as Admin (If you have UAC enabled, click yes wlEmoticon-smile.png ) on the “Azure AD Connect” icon, placed, must likly on your desktop (Thats default)

2019-10-08_11h16_12

2019-10-08_11h17_39

Click “Configure”

2019-10-08_11h18_35

Choose “Change user sign-in”, and click next. Logon with your Office 365 Global Admin account

2019-10-08_11h19_55

Remove the option for “Enable single sign-on” and click next

2019-10-08_11h21_48

And then, Configure

2019-10-08_11h23_46

Now, if the next screenshot is what you get, you are got to gowlEmoticon-thumbsup.png. If it comes with a warning, saying something like “Single sign-on could not be disabled”, have no fear, it did for me when I did some test the first time. Run the wizard to the end, wait 5-10 min. and try again. You should end up with it being succesfully disabled.

2019-10-08_11h25_12

Status: For now, we have diabled SSO. Now we need to enable it again, because its an awesome feature and we really want it……

Run the Wizard again (As an admin), and make sure you set the tick (or what ever you call it) in “Enable single sign-on”

2019-10-08_11h30_35

Click next – In the “Enter credentials” box, you need to provide your local Domain Admin

2019-10-08_11h32_22

Click OK, and next

2019-10-08_11h33_46

Click “Configure” and let the wizard do its magicwlEmoticon-confusedsmile.png

2019-10-08_11h34_41

Dont be alarmed, if it throws an error, it did for me a couple of times, just hit retry.

2019-10-08_11h38_26

Yay…success… and look, AZUREADSSOACC is back where it belongs in AD wlEmoticon-openmouthedsmile.png2019-10-08_11h39_57

Give it time to run a sync (or force one with PowerShell Start-ADSyncSyncCycle -PolicyType Delta ), but eventually it will sync back up, and work like it did before.

Happy Clouding wlEmoticon-smile.png

AADConnect password sync error

So, long time since the last post. Its been a long an very hot summer, and things are starting to turn back to Business as usual Confused smile.

I started up my lap environment, after a good long vacation, and wow and behold…. AADConnect errors Sleepy smile I needed the lab for some testing…. Oh well, time for an article then.

After booting up, and some time to sync, this messages appeared in the O365 portal

2019-08-07_12h30_05

2019-08-07_12h30_41

Disappointed smile….. Didn’t make much sense to me… “Last synced 31 minutes ago”, but “warning no recent synchronization” ???

Didn’t spend to much time investigating, figured it had something to do with the whole environment being shutdown for a month, so went straight to try and fix it…My thoughts where, that trying to disable, do a sync and then re-enable password sync, would be a good place to start.

Here we go Open-mouthed smile

Started the AADConnect wizard

2019-08-07_12h40_23

Choose “Configure”, and then “Change user sign-in”

2019-08-07_12h40_53

So, log on with your Tenant global admin cred’s

2019-08-07_12h41_28

Set the option to “Do not configure”

2019-08-07_12h33_15

2019-08-07_12h33_31

2019-08-07_12h34_05

And then “Configure”. Just to make sure it actually was synchronizing, I ran the PowerShell sync cmdlet

Start-ADSyncSyncCycle -PolicyType delta

After it was successful (Had to run it a couple of times, since the reconfiguration of AADConnect, initiates a Complete sync, which takes some time) I reconfigured AADConnect to again allow password hash sync.

2019-08-07_13h19_29

Enter your O365 tenant credentials if prompted!

2019-08-07_13h21_05

2019-08-07_13h24_43

After id was done, I waited a good 5 minutes for the initial sync, and then ran the PowerShell cmdlet again

And the waiting game started. It can take some time for O365 to realize that you actually did something, so after about 15 minutes everything looked fine again.

2019-08-07_13h31_53

2019-08-07_13h32_14

Pretty easy fix Smile

Skype for Business online – Hide some users from the adressebook – Notes from the field

Its been a while since my last post, but I’ve been busy at customers…. I know, booooring, but unfortunately I’m not filthy rich smiley confused.

At one of my recent jobs, I came a cross a “weird” question from a customer. They have ALOT (+200.000 object) of none licensed users in their tenant, and they where all visible in their SfB (Skype For Business). Meaning, when you searched for, lets say, Thomas….. They would get way more then they asked for. So what to do? 

All the non licensed users where synchronized from a different tenant (a customer tenant), and needed to be there.

Exchange Online wasn’t a problem. Since they don’t have a license, they don’t get to go in the GAL. SfB, a whole other thing.

So after doing a whole lot of research we came up with this solution, which worked, and that i would like to share with you guys. I will be using my test tenant for this, show and tell wlEmoticon-smile.png.

Find the user in your local AD (And quickly set the “Advanced view”, so you can see “Attribute editor”, within the user.)

Find the attribute MailNickName, and set it to the users account name

2018-12-10_11h18_29

Next, find msExchHideFromAddressLists and set it to true

2018-12-10_11h19_09

Sit back and let nature, or in this case, AADConnect and the Managed Folder Assistant, take action. Seriously, have a little patients, in this particular tenant, it took about 48 hours for the changes to take effect.

So knowing this, you should be able to do a short script to add this information to the users attributes.

Good luck wlEmoticon-smile.png

Seamless Sign On, Kerberos roll over–Wait what??

UPDATE: So happy to see that Microsoft has heard our prayers. They are working on a solution to automate the rollover in Azure. Read more about it HERE.


So, you’ve installed Seamless Sign On, and its been running awesome, by chance you logon to your Azure tenant, just nosy browsing around, improving your Azure skills, and suddenly you find this……. Kerberos Roll Over, wait what? erhm… What?….. Confused smile

image

First of, when I saw this, I thought it was a joke, but after thinking it over, it made sense….in a weird kind of way.

First of, when you install AADConnect and enable Seamless Sign On and Single Sign On, you get an extra auto generated Computer object in your AD called AZUAREADSSOACC.

image

This is the object in charge of handling / generating the shared Kerberos key needed between local AD and Azure AD. (best leave that one alone Smile with tongue out)

Since this is a “dead, virtual” object, it is not able to create new keys automatically, so for at best practice, MS recommends to do a manual “Roll-Over” every 30 days. I will explain how to do this in a short while, first of, cast your vote HERE, for the feature of AADConnect to do automatic Roll-Overs….Awesome, Thanks.

First of, connect your Powershell ISE to your Tenant.

(You got to know that one by now Smile)

Next you run these simple Cmdlets. (NOTE: These Cmdlets and the text is copied from the official MS documentation. Explanations where great, so no need to convert them )

(I’m really sorry, but for some reason i didn’t get the steps in, where you have to import the powershell script AzureADSSO.psd1. This script has the CMDlets you need.)

You have to run this from the server, where you run AADConnect. So, dive down to the install dir, and import this

cd “C:\Program Files\Microsoft Azure Active Directory Connect”

Import-Module .\AzureADSSO.psd1

New-AzureADSSOAuthenticationContext

#This command should give you a popup to enter your tenant’s Global Administrator credentials.


Get-AzureADSSOStatus | fl


#This command provides you the list of AD forests (look at the “Domains” list) on which this feature has been enabled.

#Step 2. Update the Kerberos decryption key on each AD forest that it was set it up on

$O365Cred
= Get-Credential

# When prompted, enter the Domain Administrator credentials for the intended AD forest
.

Update-AzureADSSOForest
-OnPremCredentials $O365Cred

#This command updates the Kerberos decryption key for the AZUREADSSOACC computer account in this specific AD forest and
 updates it in Azure AD.

#Repeat the preceding steps for each AD forest that you’ve set up the feature on

And you’re done…. AADConnect welcomes you back in 30 days Smile. Seriously, save it in a .psd1 file, for easy running, next time.

THATS why I use PowerShell ISE for everything (and the fact that my memory is really bad Open-mouthed smile)

I’ve seen some bloggers doing articles where they save Global Tenant admin’s and corresponding passwords in text files, encrypted, not encrypted and so on, in an attempt to automate this. Needles to say, this is a MAJOR SECURITY RISK, and cannot be recommended. Better yet, go cast your vote, so that MS puts this feature inside AADConnect.

Until next time, happy cloud computing Smile

Office 365 update – apps seeking pension

Just a quickiesmiley confused

A few, well used App’s are on the path to retirement.

SfB (Skype for Business) for the Windows Phone is retiring May 20th 2018. Microsoft has decided not to develop the Skype app for windows phones anymore.

OWA app for IOS and Android The much used, and loved mail app, is also retiring on May 15th 2018. More info HERE.

Alternatives for the OWA App, is of course Outlook, for either IOS or Android.

I’ve been using Outlook for both platforms, for some time now. I must admit, its getting really good. For the first couple of years, it was terrible, but they are definitely getting there.

If you haven’t, you should try it out

Outlook for Android

Outlook for IOS

Seamless Sign On and High Availability

In my previous articles I’ve written about Seamless Sign On, and for good reason. It’s an absolutely awesome feature Surprised smile. For small and midsize companies wanting to go “up” the Cloud road, not having Exchange, SharePoint and so on, with the high cost, tons of expensive maintenance in their Onprem environment.

Office 365 is, in my humble opinion, the only way to go. But what about the users. Well AADConnect is a must, if you have your own AD. So you have 4 options for authentication…

– User sync but Cloud only password

– Password synchronization

– ADFS Single Sign On

– Seamless Sign On

User sync but Cloud only password

Not really an option in my book. We want to make it easy for the users and not giving them 2 sets of credentials to worry about. (gives us less time to enjoy a good cup of coffee Winking smile)

Password synchronization

Could be a possibility, but why would you force your users to login twice?

ADFS Single Sign On

Absolutely, IF you want to maintain 2 ADFS server, 2 WAP servers and you AADConnect server. ADFS is an awesome feature. But it leaves a fairly large footprint in your infrastructure, especially if you want high availability. Maybe not the best solution for the smaller to midsize company’s.

Seamless Sign On

YESSSS…. You guessed it…. Seamless Sign On to the rescue. First of, I’ve never had an AADConnect service break down, its very stable (Big thanks to the guys at Microsoft Thumbs up). Second, if the server you’ve installed AADConnect on crashes, well users won’t be able to logon. But why bother getting stressed about it? Just make it High Available Winking smile. With the newer versions, you have the option to install AADConnect Authentication Agent.

So, here we go Fingers crossed

First of, a little about my test setup. I have 2 Domain Controllers and one File server. AADConnect is installed on DC01 (I won’t go into the installation process of AADConnect), and I want to install the AADConnect Authentication agent on my File Server.

Logon on to your O365 tenant, and go straight to the Azure Portal –> Go to “Azure Active Directory” –> then to “Azure AD Connect”

image

Click on “agents” (please disregard the warning sign and the 3’rd agent, it was for testing purpose, and it takes a while for Azure to realize, its not there anymore, and I was so excited to write this article, that I didn’t have the patience to wait for it to go away.)

image

At the top left, you have a Download option, this is the agent install file. (I’ve cheated, and already installed it on the File server… Shh…)

image

It’s a Next –> next, finish installation, so no need to document that.

After a short wait, the second “agent” will popup in your view. Now, your Seamless sign on setup as HA…. And yes, it really is that easy.

In my setup I have 2 DC’s, so if the AADConnect DC crashes, the Authentication agent on the File server, still has authentication against the second DC.

The “downside” to this, is you’ll need at least 2 Domain Controllers, for this to work, but with multi-role servers today, I don’t see this as any issue.

Hope you enjoyed, this little write-up. Feel free to comment Winking smile

Seamless Sign On – How to and why

Seamless Sign On, what is it and why would you want to use it

Well, good questions. Seamless Sign On is a fairly new feature in Azure ADConnect, that allows users to have that “Single Sign On” experience, you get from using ADFS, but without the huge infrastructure. I can’t really see a lot of large companies using this feature, but for smaller / midsize businesses it makes a lot more sense. Why? Make it as easy for your users as possible, they would only need to remember 1 password, and you, as and admin, are in control of your users ID’s and passwords, from within your local AD (which in return will give you more time to enjoy your coffee)

So, lets get to it and start looking at the configuration. It doesn’t matter if you already have Azure ADConnect installed, or its a new installation. Its the same settings for both scenarios.

First of, start the AADConnect wizard. If you install AADConnect for the first time, the below is what you need to configure.

image

If you already have AADConnect running, this is what you need to configure.

image

On a side note, I would always recommend using OU filtering, so that you only synchronize what you need, and not all objects from AD. It will only look messy and confusing.

image

After configuration is done, you need a little more work on the client side. You need to set up GPO’s to allow Azure to receive the Kerberos tickets for Authentication before it works. So you need your browser to trust some sites.

Internet Explorer

For IE users (the few left smiley lol), you need to add some URL’s to the local intranet zone. Preferably done by GPO. These are the 2 addresses you need to add:

https://autologon.microsoftazuread-sso.com
https://aadg.windows.net.nsatc.net

Chrome

For Chrome users, there is a little more work, but it pays of. First of, download the Google ADMX files and add them to your AD, so that you are able to configure Chrome with GPO’s. Afterwards go to the Google Extension store. Search for “Windows 10 accounts”

clip_image002

Right click on the the logo and copy the link address.

clip_image004

Paste it to notepad

image

Copy the “app id”, from the last dash, to the questionmark, and paste it on a new line. Now you need to format the address for the Chrome GPO.

Separate the 32 character ID, with the default Google store address ;https://clients2.google.com/service/update2/crx, so that it looks like this

ppnbnpeolgkicgegkbkbjmhlideopiji;https://clients2.google.com/service/update2/crx

Find the correct Computer GPO setting for Chrome extensions

clip_image006

Open up “Configure the list of force-installed apps and extensions

Enable –> show, and paste the above ID address we created a few seconds ago

clip_image008

Save the GPO and link it to the OU where your computers are located, and you’re in business.

Once the GPO is “active” on clients (if it doesn’t happen run gpupdate /force, might require a restart) you will see the little Windows logo on the right topside of Chromeimage

Try and click on it smiley surprise, or just go to https://portal.office.com.

I have not tested it with other browsers. Edge browser isn’t supported, go figuresmiley disappointed

Pros and cons

I my opinion this as an awesome feature. Some of the smaller customers that I have helped, would definitely have benefited from this, instead of an ADFS infrastructure, but that’s just me smiley sunglasses. I will list my view on pros and cons here.

Pros

  • Users, need only to remember their AD password, and get easy access to your Office 365 tenant
  • Easy configuration, no need for expensive certificates, or a larger infrastructure as with ADFS
  • If browsers are configured correctly, the Seamless Sign On is as close to the Single Sign On, as you can get
  • The AADConnect / service is really stable. I have yet to see it crashing, or break down
  • Low footprint in your infrastructure. With installation on Domain Controllers being supported, or maybe your file server / application server, you don’t need dedicated HW / VM to run add extra costs


Cons

  • If the service is down, users can’t login. It’s possible to make the solution High available, but for that you will need one more local server to install an agent on
  • hmm… not sure I can find any more cons, but if i do, I’ll be sure to update smiley lol


Have fun, and enjoy.

UPN mismatch – ImmutableID fix – AADConnect gone wrong

In relation to my very first article, problems can occur. I had a question from a colleague, about a customer, who was using Office 365 and had a local AD. They where not using AADConnect, and would like to do so.

Challenge no.1, how to “match” the AD users with the Office 365 Cloud users? You can see more about how to do that in my first article here.

Matching up the users isn’t the biggest problem, the biggest problem is all the things that can go wrong, and you end up with sync problems, mails about UPN mismatch and so on.

I’ve come across this issue a few times before, and haven’t found one solution to the problem, but gathered information from 3-4 other articles and sites, mixed in a delicious cocktail of my own experience. That’s why I decided to write-up my own solution to the problem.

This is concerning the UPN mismatch, when an AD object has the same UPN and SMTP address as a cloud object. The mistake can happen for various reasons. The one reason I’ve seen the most, is when an AD object has been attempted synchronized, with the wrong UPN suffix (Office 365 will automatically give it the default UPN of user@tenant.onmicrosoft.com. Once you change the UPN to your public domain, locally and sync it, it will throw a UPN mismatch error in a mail to your admin account

error email


And also in the portal ☹

error portal

Once this has happened, you will need to do a little bit of work to get the accounts merged.

I assume you are familiar with signing in to Office 365 via Powershell, you’ll need it in a minute 😊, if not, I’ve included the few steps to get going.

You need to have the Office 365 Powershell module and the sign in client. You can download both here

This is the simple logon “script” I use. Logon with your Global Admin credentials to your tenant.

$O365Cred = Get-Credential

Import-Module MSOnline

Connect-MsolService –Credential $O365Cred

$O365Session = New-PSSession –ConfigurationName Microsoft.Exchange -ConnectionUri https://ps.outlook.com/powershell -Credential $O365Cred -Authentication Basic -AllowRedirection

Import-PSSession $O365Session


Next, import the Active Directory CMDLets

Import-Module ActiveDirectory


In my lab setup, I have AADConnect installed on a Domain Controller (This is now fully supported by Microsoft btw 😉)

Now, we are ready to go.

First of, if you have set up your AADConnect with OU filtering, your fine, if not, create a new OU, that is NOT synced with your tenant.

  1. Move the user you are having trouble with, to an OU that is not synced. In my case the user is Test User 5 (tu05)
  2. Force a sync
    • Start-ADSyncSyncCycle -PolicyType Delta
  3. Your synced user should now be in the deleted folder in Office 365. You need to delete it from the recycle bin.
    • Remove-MsolUser -UserPrincipalName tu05@omg365.onmicrosoft.com -RemoveFromRecycleBin

deleted user

Next, we need to run a series of Powershell cmdlets, to extract the ObjectGUID from the AD user and change the ImmutableID of Office 365 user with the result.

  1. First of, we need to change the UPN of the cloud user, from tu05@omg365.dk to the tenant domain tu05@omg365.onmicrosoft.com, if you don’t do this, you’ll receive an error, later on, when changing the ImmutableID.
    • Set-MsolUserPrincipalName -UserPrincipalName tu05@omg365.dk -NewUserPrincipalName tu05@omg365.onmicrosoft.com


  1. Next, we need to find the ObjectGUID of the AD user, convert it to an ImmutableID, and assign that ID to the Cloud user.
    • $ADUser = “tu05
    • $365User = “tu05@omg365.onmicrosoft.com
    • $guid =(Get-ADUser $ADUser).Objectguid
    • $immutableID=[convert]::ToBase64String($guid.tobytearray())
    • Set-MsolUser -UserPrincipalName “$365User” -ImmutableId $immutableID
  2. Before syncing up, you’ll need to change back the UPN of the cloud object, otherwise, you’ll be in the same problem state as before, but reversed 😉
    • Set-MsolUserPrincipalName -UserPrincipalName tu05@omg365.onmicrosoft.com -NewUserPrincipalName tu05@omg365.dk

So now, we have ”prepared” Office 365 to Hard Match the AD user with the Cloud user, but before we do so, we need to change a few things on the AD user.

Start of by locating the user in the OU that is not synced with O365

  1. Make sure the E-mail is correct on the “General” fan of the user
    • ad user
    • Next, go to “Account” and change the UPN, change it to your public / e-mail domain name
    • upn
    • Lastly, move the user to the original OU, and force a sync (or wait for the magic to happen, New default sync is 30 min.)
    • Start-ADSyncSyncCycle -PolicyType Delta

Be patient, it can take a while for the change to show up.

Before synchronizing

in_cloud

Voila, After synchronizing

synced

Your AD user and your Cloud user have been merged, and everybody is happy 😊

Merging local AD users with Cloud users


Office 365 is no ”new kid on the block” anymore, and most companies are running with AADConnect, with or without ADFS. But I still see smaller customers, who have a local AD and an Exchange Online tenant, without any connection. It rarely takes a lot of time to convince them, that managing 2 user accounts, is a lot more work, and usually they are REALLY tired of changing the online password, because users forget! Or perhaps, even worse…. They set the passwords to never expire 2018-02-06_15h55_49

So, is there an easy way to “merge” the two? Yes, but you need to plan it well, and have all the settings of your users correct.

I’ll describe it in the following steps.

I already installed AADConnect, and made sure to use OU filtering, meaning, that I only synchronize certain OU’s to Office 365. In my case, the “Users” OU is synced. The OU “Not synced”, is were my users that I want to sync are located.

AD_OU

In my Office 365 tenant, I have my 3 cloud users (I’m aware that one of them is missing a license, but that doesn’t really matter 😊)cloud users

  1. So, first step is to makes sure that the local users have the correct settings Make sure, that their correct email address is in the “E-mail” fieldAD_user
  2. Next, choose the “Account” tab, and make sure that the users UPN matches your public mail domain added in Office 365correct UPN
  3. If you have a “local” domain (in the old days, it was fairly normal that the AD domain was .local .lan or something not internet routable.) You need to add your SMTP domain as an UPN suffix. Open “Active Directory Domains and Trusts”, takes properties and add the domain.

add upn to adadd upn to ad1

Make sure you make that change to all your users. 😮

  1. Now were ready to start merging users. You might want to test with a made-up user first, but otherwise its just start moving users to the synced OU and run AAD Sync.
    • To force a synchronization you need Powershell, otherwise you have to wait up to 30 min (default sync time)
    • Logon on to your Office 365 tenant with Global Admin rights. Then run the following command
    • Start-ADSyncSyncCycle -PolicyType Delta


Wow and behold. Users who, before the change had 2 passwords and 2 user accounts to maintain, can now benefit from all the features of AADConnect 😊

cloud synced users